Author: Bridget King

Home Improvement: Drywall Repair

drywall

Small indentations, scrapes, and holes can easily be fixed with spackle. Then a little interior painting and your walls will look like new again! But larger issues, such as cracks due to house settling or water damage, require a more involved repair process.
drywall

Cracks appear in the drywall panels that form your home’s walls and ceilings. They manifest due to shifts and settling in the foundation, causing the drywall to move and expand or contract. Small hairline cracks are generally nothing to worry about and reflect natural movement of the house, but they can be early warning signs that you may need a serious foundation repair. Large, jagged and diagonal cracks are definitely red flags and indicate that a serious problem exists.

The first step to repairing a crack in drywall is to assess the severity. Look at the size, direction and location of the crack to see if it is superficial or deeper. If the crack is long and reaches across part of a wall or ceiling, it’s likely an indication of major structural damage that requires professional attention.

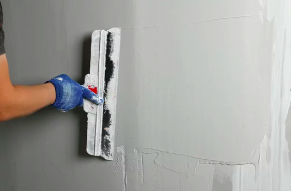
If the crack is small and has not changed in size, it’s probably just surface damage and you can cover it with a coat of paint or joint compound. If the crack has widened and is changing in shape, then you need to add some reinforcement and fill the gap. Use a putty knife to apply a thin layer of joint compound (also known as drywall mud) to the crack, then smooth it out with a 3- to 4-inch drywall knife. Using the knife, press the putty into the crack to make sure it is secure and to fill in the gap.

You can also use a strip of fiberglass mesh drywall tape to reinforce the area and keep it from cracking again. This is a much stronger material than duct tape and can be purchased at most hardware stores.

When repairing a drywall crack, you should always be careful to not just mask the problem with spackle and paint. If you don’t address the root cause of the cracks, it’s likely they will reappear, possibly worse than before. Instead, hire a qualified professional to take a look and provide you with the best solution. Most likely, they will recommend that you get extensive foundation work done to correct the problems causing the cracks in your home’s structure and foundation.

Holes

Small dents and holes in drywall happen from moving furniture, dropping something hard on the wall or kids and pets playing indoors. These are minor blemishes that can usually be easily repaired with spackle or a mesh patch kit.

When repairing drywall, make sure that the area is clean and dry before you begin. This is especially important if you’re going to be painting the area soon. Also, be aware that repairing drywall can create a lot of dust and debris so it’s best to move anything you don’t want covered in dust or plaster out of the way.

Once the drywall repair is complete, sand it smooth and apply a primer to help it blend in with the rest of the wall. Finally, you’re ready to paint.

The cost of repairing a hole will depend on the size and extent of the damage. It will also depend on the materials and labor required. Generally, however, the national average is $50-$80 per square foot of damage.

Larger holes will require more than a spackle kit and will need to be braced. To do this, use a utility knife to cut a section of drywall around the damaged area that’s two inches above and below the hole. Then, carefully pry the corner bead from the wall and remove it using a wide straight-blade screwdriver or thin pry bar.

If the hole is in a corner, you will need to install a new piece of corner bead to match the old one. This will require cutting a length of furring strip to the correct length and then installing it using drywall screws. Depending on the size of the hole, you may need to install another furring strip along the edge of the wall on either side of the hole to ensure that it’s securely fastened to the surrounding wall.

Once the drywall patch is in place, you’ll need to cover it with a layer of joint compound. Then, use a putty knife to smooth the compound and feather it into the surrounding wall. After the second coat of joint compound is dry, you’re ready to paint. Make sure that you prime the repaired area to seal the joint compound and drywall and prevent it from reacting with the finish paint.

Sagging Ceilings

Sagging ceilings can be more than just unsightly – they can be dangerous, especially if they’re at an advanced stage of sagging. If the sagging is severe, the underlying support beam may need to be replaced or at least reinforced, which will require contractors. In such cases, it’s best to have a professional building inspector conduct a thorough pre-purchase inspection so that they can identify the cause and recommend the most effective repairs.

Drywall ceilings can become sagging from several causes, including insufficient fastening or poor support construction. It can also be caused by water damage, aging and environmental conditions like humidity levels. Even long-term exposure to vibrations can cause a sagging appearance. This could be from the roller doors on your garage or if you live near to a railway line, for example.

Another common reason for sagging is excess weight through insulation layers. Insulation is added to drywall to provide both thermal protection and extra strength against gravity pulling down on the wall or ceiling from above. If too much is used, this can add a lot of extra weight and cause the drywall to sag.

If a sagging ceiling is caused by water damage, it’s crucial to call in a plumber as soon as possible to stop the leak before it worsens. If left unaddressed, water can lead to wood rot and structural joist warping which can then contribute to a ceiling collapse.

If a home’s foundation has shifted over time, this can cause sagging in the drywall and may be an indication of a serious problem with the structure. An expert building inspector can help determine the extent of the foundation shift and whether it needs to be replaced or just patched.

Mold

Mold on drywall is a serious problem and should be dealt with immediately. If left unchecked, it can spread to other parts of the house and wreak havoc on health and structural integrity. Mold is usually spotted as dark splotches and is commonly found in high-moisture areas like bathrooms, basements and kitchens.

First, make sure you are wearing proper protective equipment. You will want rubber gloves, goggles and a respirator mask to keep from breathing in any mold spores that may be airborne. You will also want to remove any furniture from the area and cover the floor with plastic sheeting. Then, spray the area with a mold-killing solution. You can use a natural cleaner such as baking soda or borax, or for more severe cases, a bleach solution. There are also store-bought spray solutions such as Concrobium Mold Control that will eliminate mold and mildew while creating a protective barrier against regrowth. Be careful not to over-spray the area as excess moisture will only cause more mold growth. After you have sprayed the area, scrub it using a brush or toothbrush and wash off any remaining residue with a damp sponge. Once the area is clean, you will want to dry it as much as possible. Be sure to point a fan directly at the spot and let it run for 24 hours.

It is important to address the source of the moisture that caused the mold in the first place. This could be a leaky window or pipe, a roof issue or improper ventilation in the space. Once the moisture is fixed, the mold should not return.

If you notice mold on painted drywall, it is a sign of a bigger issue in the stud space behind the wall. It is possible to remove the moldy drywall and replace it, but you will need to hire a professional to make sure that you are getting rid of all the spores that have grown into the wood studs. You will also need to treat the surrounding drywall with a mold and mildew primer like Kilz to prevent regrowth.

What You Should Know About Residential Painters

painters

Residential Painters Perth offer services specifically for home exteriors and interiors. They know how to choose the right paints, stains and color palettes to help your house look its best. They also have the expertise to complete painting jobs quickly and efficiently without disrupting your daily routine. They can complete a job while you are out of the house and return to it once the work is done.

Painter’s License

paintersIn most states, a painting license is required to work as a residential painter. However, the specific requirements vary from state to state. Some require a trade test, business and law exam, and a financial statement. Others may also require a background check and references. Some even require certification to work with lead paint. It is best to research your individual state’s requirements before beginning a new career as a residential painter.


For example, in Alaska, a residential painter is required to hold a state license to perform the job. They must pass the Statutes and Rules exam, a trade test and provide proof of two years of experience. However, a commercial painter is not required to have a state license for the job.

Other states have different requirements, such as Mississippi, which requires painters to pass a trade test and a business and law exam. Those who wish to work on public projects, such as schools and hospitals, must take additional classes to be certified. New Jersey, on the other hand, does not require licensing for residential painters, but they are required to register their painting business. They must display their registration number prominently on all advertisements and business documents.

A painter’s license is required in Georgia to work on any project that exceeds $2,500. Applicants must pass the state’s business and law exam, present a financial statement signed by a CPA and carry general liability insurance and workers’ compensation insurance. In New York, a license is required for residential painters who are working on renovations or repairs to older buildings or child-occupied facilities. In addition, a permit is needed to work with lead paint and additional courses are required.

There are a few states that do not require a license to work as a residential painter, such as Connecticut and West Virginia. However, a contractor license is required in both of these states for anyone who works on construction projects that exceed $1,000. Those who specialize in both commercial and residential buildings must secure a specialty contractor license. Those who only work on residential buildings must obtain a general contractor with a residential endorsement.

Insurance

Painting is an art form, but it’s also a labor-intensive and dangerous job. If 5 gallons of white latex are spilled on your new leather couch or a ladder crashes onto your convertible, you want the peace of mind that comes from knowing that your professional painter has you covered. That’s why you should always choose a painter with general liability insurance. This type of policy protects you from claims resulting from accidents and property damage that occur at clients’ homes or offices. Most states require a minimum of GL coverage, but it’s important to find a policy that offers maximum protection for your business.

You can usually get the best deal on painters insurance by purchasing a “contractor package” or a “business owners policy.” These bundled policies typically include all of the necessary business insurance for painters, and the premium is often lower than what you’d pay for each policy separately. A reputable insurance provider such as Nationwide, Rockingham Casualty Company or Contractors Bonding and Insurance Company might offer this option.

If you’re hiring employees, a workers’ compensation policy is also essential. This type of coverage pays for medical expenses and lost wages if an employee is injured in a work-related accident. Most states require workers’ comp, but it varies by jurisdiction.

Finally, you should have a commercial auto insurance policy for vehicles used for business purposes. This can include cars, trucks or vans that you use to transport your equipment and supplies between jobs. You can usually buy this type of policy in a bundle with your other business insurance, and you may qualify for discounts if you insure multiple vehicles under one policy.

Painters business insurance is an important investment for your small business. It helps to give potential customers peace of mind and may help you drum up more work. When interviewing contractors, ask to see proof of their insurance before hiring them. Look for a certificate of insurance that lists the policy number, name of the insurer and contact information. If they’re reluctant to provide this documentation, that’s a red flag.

Equipment

Painting requires a lot of tools and equipment. Some of these make it easier to prepare the surface for painting and others help you paint faster and more accurately. A few essential items include safety equipment, cleaning supplies, a paintbrush or roller, and sandpaper. A few other important tools are a paint scraper, drop cloth, and caulking gun. These are all available at home improvement stores and online.

When you are starting out, it is best to specialize and stick with interior painting until you have the experience and the equipment to tackle exterior or commercial work. Focusing on a specific type of painting will allow you to make an accurate estimate for each project and avoid overspending or underquoting.

Before beginning a job, it is important to clean the walls with wall cleaner. This will ensure that the paint adheres to the surface and does not peel or crack. You can also use a wire brush to remove loose paint. If the wall has cracks or holes, you can use fillers such as Selleys to repair them.

A ladder is an essential item for residential painters to have. A basic stepladder is inexpensive, and it can be used for both indoor and outdoor jobs. If you have a larger budget, you can buy an extension ladder that will allow you to reach higher areas of the house.

You can purchase a wide range of paint brushes and rollers from the internet or at your local hardware store. You can even find a foam brush that is one-time use and easy to dispose of. These are perfect for small touch-ups.

Other essential painting equipment includes a tape measure to ensure that you are measuring accurately. This helps you to order the right amount of paint and avoid overspending. A paint stir stick is also necessary to mix your paint properly. This will ensure that your color looks great after it dries.

It is also wise to invest in a large bucket. This will be useful for storing multiple paint cans of the same color. This will save you money and time as you will not have to open a new can each time. You should also consider buying a paint sprayer to speed up the process of painting and cover a wider area.

Training

Residential painters are experts when it comes to painting the interior and exterior of houses. They are experienced in conducting painting work for simple houses and can provide you with all the required color combination that will suit your house. They also know how to protect your furniture and floors while they are carrying out the work. Moreover, residential painting contractors can give you an instant quote about their services and can complete the painting work within your allotted time frame.

Commercial painters are those who conduct large works like painting of offices, restaurants and other multi-family buildings. These projects are much larger in scale and require more workforce to meet the deadlines. Moreover, they use more advanced equipment to cover large surfaces. They can also offer a wider range of painting services than a residential painter.

Some states have laws that classify painters as general contractors, which requires them to be licensed at the state level. This means they must have workers’ compensation and general liability insurance, as well as submit other reports. The state of Oregon, for example, requires painters to pass a trade exam and have general liability insurance.

Aside from being able to handle the responsibilities of the job, residential painters should have a strong focus on customer service and good communication skills. They should also have a high attention to detail and an eye for color and design. Additionally, they should have a steady hand and upper body strength to be able to reach the highest points of a home.

There are a few ways to get trained for this career, including taking courses at a local community college or enrolling in a painting apprenticeship program. Many apprenticeships allow students to work on the job with experienced house painters and learn the trade. In addition to hands-on training, aspiring painters can also take a series of classes and earn a certificate or Associate’s degree in the field.

There are a few states that don’t require painters to have a license, but they may need to register with their city government and have general liability insurance and workers’ compensation insurance. The state of Colorado, for instance, doesn’t require a licensing requirement, but it does require painters to be registered with the EPA to report hazardous waste. It also requires painters to have 16 hours of Renovation, Repair and Painting (RRP) training from a certified provider.


Log Home Maintenance – How to Prevent Moisture Damage

log homes

Moisture is one of the greatest threats to log homes. It can cause mold and mildew as well as rot. A few preventative measures can help minimize moisture damage to your log home. Start with the basics, such as washing the exterior regularly. This removes surface contaminants like dirt, pollen, dust, and bird droppings. For more information, you can contact Richardson Log Homes LLC

Inspect the Roof

log homesUnlike many other types of houses, log homes often have very steep roofs. This is a good thing because it helps protect the wood from moisture problems. However, it can create challenges when water runs off the top and splashes onto lower logs or the deck below. This can cause serious rot and insect infestations.
One way to help prevent this is to ensure that there are adequate overhangs on all of the roof areas. This will help prevent water from directly hitting the logs, and also make it easier to clean. In addition, you want to make sure there are no tree limbs that are touching the roof. This can create moisture issues and lead to a build-up of mold.

If you are buying an older home it is a good idea to have a professional inspection done by someone that has experience with log homes. This will help you recognize potential problems and be able to negotiate properly.

During the home inspection look for humps and valleys, roof material, flashing condition, and seals around chimneys and vents. Make sure that the gutters are not clogged and that down spouts are working properly.

Another thing to check for is a dark stain that looks like black surface fungus. This is a sign of rot and needs to be eradicated before staining. Look for a darker color on the log ends as well, this indicates that they have been exposed to the elements and should be treated with Shell-Guard before staining.

You should also look for any cracks in the logs. Small cracks are normal and not a big deal, but large ones should be inspected carefully by a specialist. It is also a good idea to look for signs of carpenter bees and ants in the area. They will leave little piles of sawdust, which you can identify by putting some masking tape over the spots and checking them a few days later. If you see any of this, have a pest control specialist come out and do an inspection and treatment.

Inspect the Walls

Log homes are vulnerable to moisture and rain because they do not have the same protection that frame houses have. They need to be properly flashed and drained to prevent water saturating the logs which can lead to rot. It is also important to examine the logs for rot, cracking, checking or other signs of dampness. Often this can be corrected by chiseling out the rotten areas and treating with a wood preservative. It is also a good idea to have any logs that are showing sign of mildew or mold removed and stained.

Inside the home, check for light and air infiltration between logs as well as leaking windows, doors and their frames. It is also a good idea to hose down the walls, studs and other framing. This helps to lift dirt and microorganisms that can damage the wood over time.

On the outside of the house, look for: clogged gutters and downspouts, erosion or loss areas around the logs, splashback from eaves or roof overhangs. In addition, check that the roof rafters, purlins and ridge beam are not exposed to the weather. It is important to inspect the chinking and caulking in general for: cracking, loosening or peeling, signs of dampness or mold, popped knots and faded stain.

In addition, if the logs are not protected with a good quality log finish, it is recommended that they be media blasted and restained every three years to protect against rot, weathering, insect infestation and mold. This is best done by professionals who can handle the equipment required for this process.

Moisture is the biggest natural hazard to log homes. It can enter through clogged drains and downspouts, overgrown vegetation and improperly built foundations. It can also be caused by untreated logs or poor construction methods.

Fortunately, this is easy to avoid by implementing a good maintenance plan. It starts with the roof and continues with the logs, girders and other structural components of the home. Then, by maintaining proper drainage, insulating and properly staining, the logs will last for many generations to come.

Inspect the Gutters

When you walk around the outside of your log home, take some time to check that gutters are not clogged with leaves. Having them clogged can cause water to be directed at the logs rather than away from them. This can result in rot and damage.

Also, look for any leaking windows or doors. Even if it is only a small drip, this can add up and cost you in the long run. Checking weather stripping can also be beneficial as this is another area that can leak and let cold air in and bugs out.

Moisture control is critical in log homes as they tend to absorb moisture quickly. This can lead to problems like rot and insect infestations. A proper waterproofing and insecticide treatment applied to the logs can help protect them. Proper drainage plains, high quality gutters and down spouts and roof overhangs are also critical in keeping moisture away from the logs.

Look at the bottom courses of logs (a good builder will have a 3 foot roof overhang to keep moisture away from these lower courses) to make sure they are not damp and for any signs of rot or insect infestation.

Usually, any check or crack that is over 1/4″ wide can be filled and caulked easily. However, if they are left unattended this can allow water to get into the logs which leads to rot and darkening. This can be very expensive to repair.

In addition, if there are any areas that have been painted over with a latex paint, this should be stripped and repainted to avoid any potential issues. Checking for latex paint is important in any home, but is especially critical in a log cabin where it can lead to premature failure and costly repairs.

Finally, check all landscaping to make sure that nothing is touching or near the logs. Plants like ivy or creeping thyme that grow close to the house can cause serious damage and should be pulled or removed. Also, any brush that is close to the logs can create a path of travel for insects and should be removed or trimmed back.

Inspect the Exterior

Once the weather starts to warm up it is time to walk around your cabin exterior and check it over. This is a good opportunity to make sure that the logs have not started to lean or rot in any area, and that the exterior finish has not started to fade or peel. It is important to walk the full perimeter of your cabin, looking for areas where the wood may be exposed or rotting, such as porches and decks, where logs touch each other and where the home meets the roof (rafters, purlins, and ridge beam). Look for signs of insects in the logs. Also, look for black spots on the logs where water has soaked into the wood and left decay and mold or mildew behind. Check caulking. It is important that the caulking in a log home remain tight. Old caulking can shrink and allow air infiltration as well as bugs to enter the home. Check window and door bucks as well as the butt joints for loose caulking, especially in upward-facing checks that can collect rain and dirt.

Checking for settling is important in any handcrafted log home. If the logs start to settle they will pull apart and allow water to get into the interior walls. This can cause problems with doors and windows that were built with settling space above them, as well as damage to stairways and conventionally-framed partition walls. It can also cause issues with plumbing and electrical systems in a log home, as rigid pipes and conduits are not designed to withstand the pressure of shifting logs.

A good inspector will be able to detect these problems before they become serious and recommend corrective action. Make sure that the home inspector you hire has experience with examining log homes. Many general home inspectors do not have the expertise necessary to properly inspect a log structure and recommend the correct corrections. You can find a qualified log home inspector by using the Log Home Professionals Directory.

Why You Should Get a Sewer Scope Inspection

sewer

Sewer Scope Inspection Near Me is an excellent add-on to any home inspection. It’s especially important for older homes. Sewer lines can become damaged for many reasons. Root intrusion, settling, and ground shifting can cause problems. Adding this service is an easy way to provide more value to your clients.sewer

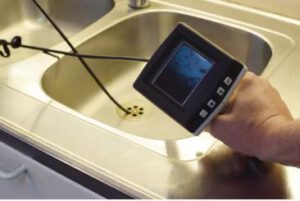
As a property owner, if you are concerned about your sewage lines or suspect damage that could lead to costly repairs down the line, you should get a sewer scope inspection. A specialized contractor will run a camera attached to a long cable through your private lines from the house up to the city sewage line or septic tank. They will be looking for tree roots, ground shifts, hairline cracks, and other signs of trouble brewing in the pipes.

Homebuyers should also have a sewer scope inspection before buying a new home. Clogs and other problems can occur that won’t show up until solid waste is introduced into the system. In addition, homes built before 1970 may have Orangeburg drain lines that are prone to root damage and degradation.

Sewer lines can also develop low areas or bellies that collect water and waste. These can become difficult to maintain and repair and can cause backups or slow draining in the home.

A reputable inspector will advise you on the condition of the lines and offer you options for repair or replacement. They will provide you with a written report detailing the results of the inspection and any recommended next steps.

Adding sewer scope inspections to your list of services can help you expand your customer base and increase the profitability of your business. However, before making the investment in equipment, you should consider the costs and benefits of this add-on service.

To begin with, you will need a high-quality sewer scope camera that is easy to maneuver and can be operated by a single person. You will also need to purchase or rent a portable power unit to provide electrical power to the camera and lights. Once you have the equipment, you will need to attend a training course to learn how to operate and maintain it.

Once you’ve completed the training, you will be ready to start performing inspections. Your inspector will first need to establish the location of the access point and check for leaks at that location. Then, they will place drop cloths to prevent dirt and debris from getting on the camera or the surrounding property. Once the area is prepped, the camera will be pushed through the pipes and any blockages, issues or defects will be documented in a thorough report.

When a home inspector runs a specialized camera along your sewer line, they’re looking for a few key things. They’re looking for clogs, broken pipes, and any other damage that could cause issues in your home or on your property. They’re also looking for the location of your lateral sewer line. This is especially important for older homes that may have a different style of line than newer homes.

A sewer scope inspection can help find these issues before they become a major problem. This means that you might be able to save yourself a lot of time, money, and headache by getting the inspection done early on.

If you’re a home inspector, adding a sewer scope to your residential inspections is a great way to increase your revenue without requiring much extra work. The process only adds about 20-30 minutes to the overall inspection, and you can make a good amount of money from this add-on service.

Before your inspector begins running the camera, they’ll flush out all of your drains to make sure there aren’t any big problems lurking. Then, they’ll locate the access point for the lateral sewer line. This is typically at a manhole or in a cleanout on your property. Your home inspector will then place a drop cloth in the area to protect against dirt and debris being tracked into the house.

Once they’re in position, your home inspector will use a long cable to run the camera down into your sewer line and record the footage. They’ll look for any areas where the line has a low spot (called a belly). These low areas can collect waste and water, which can cause back-ups and structural damage over time.

Another common issue that your inspector will look for is any breaks or cracks in the lateral sewer line. These can be caused by tree roots or just by age and wear. Your inspector will be able to identify the location of the issue and advise you on what needs to be done to fix it.

Getting a sewer scope inspection is a smart move for homeowners and buyers alike. It can help prevent costly repairs down the road, and it can give you peace of mind that your lateral sewer line is in good condition.

A specialized camera mounted on a long cable is inserted into the sewer line to look for damage, blockages and other issues. It’s best to have this inspection done before you start any plumbing work on your home, but it’s also important to have a regular checkup to ensure your lines are in good condition.

This is especially true for new homeowners who are getting ready to buy a home, as damage to the sewer line could cost thousands of dollars in repairs and create unsafe living conditions for future residents. Since it’s impossible to tell the condition of a sewer line from the outside, a home inspector should always conduct a thorough visual inspection and, if necessary, a video sewer scope inspection prior to purchasing a property.

The process of a sewer scope inspection is very simple, and it only takes about an hour for the inspector to complete. The inspector starts by locating the sewer line cleanout, which is usually in the basement or crawlspace. The inspector then opens the access point and flushes out the line with water to lubricate the equipment and prevent it from catching on debris. Once the line is clear, the inspector begins running the camera down the pipe. The camera can see small cracks, collapsed sections and other problems that would be difficult to find with just a visual inspection.

Once the inspector is finished with the camera, they’ll write up a report for the homeowners and potential buyers to review. They’ll note the location of any problems in case the home needs to be repaired, and they’ll also provide recommendations for how to prevent future issues.

Sewer line damage is one of the most common and costly problems that homeowners face, but it’s something that can be prevented with regular maintenance and proper installation. For those looking to sell their homes, a sewer scope inspection is an excellent investment that will help them get top dollar for the property. Homebuyers should always ask for a full sewer scope inspection before making an offer, and homeowners should have their lines checked regularly to avoid expensive repair bills.

Cost

While the cost of a sewer scope inspection will vary depending on where a home is located and its particular needs, this service typically costs about $150-$400. Considering that the cost of repairing or replacing a damaged sewer line can run thousands of dollars, this fee is well worth it in the long run.

As a home inspector, adding this valuable additional service will allow you to broaden your customer base and increase your revenue potential. While the initial investment in camera equipment may be steep, the return on your investment will be much more rapid once you have a steady flow of new clients.

It’s important for inspectors to follow certain protocols when performing a sewer scope inspection. For example, it’s necessary to flush out the access point and drain with water to ensure that your camera can move freely. Additionally, it’s a good idea to pause and document any issues you come across as you push the camera through the pipes.

In addition, if your equipment fails during a portion of the inspection, it’s important to communicate this to your client both verbally and in your report. This will help you avoid any future disputes or claims over what you were able to or not able to inspect.

Adding a sewer scope to your pre-purchase inspection services will also help you protect yourself from liability. Many older homes have Orangeburg and cast iron sewer drain lines that are not as durable as today’s PVC lines. These lines can suffer from clogs, root damage, and other issues that could lead to costly repairs down the road. By incorporating a sewer scope into your pre-purchase inspection, you can identify these issues before they become major problems. This way, you can either walk away from the sale if the issue is serious or negotiate with the seller to cover the repair cost. It is also a good idea to schedule regular sewer scope inspections as a homeowner to identify any small issues before they turn into major problems. This will help keep your pipes in great condition and prevent costly repairs down the road.

What Types Of Car Insurance Are Available?

Depending on the carrier and the state you reside in, different types of car insurance policies are available. Car Insurance Springdale AR policies provide different types of coverage, some of which are mandatory by law, mandatory for leased vehicles, and optional for financed vehicles. These different types of insurance coverage are listed on the declaration page of the policy. It’s important to read this page carefully, as some coverage types are subject to deductibles and limits. If you are planning on altering your carrier, make sure that you check these factors before renewing your policy.
car insurance policyThe deductible for your policy will vary, but it’s still better than paying for uninsured motorist coverage out-of-pocket. Property damage will cover damages to another person’s car, as well as the cost of repairing your car. Also, you can purchase optional riders to amend your standard coverage. Some of these optional riders include full glass replacement, rental car reimbursement, and roadside assistance. When renewing your policy, make sure to check all of the extras and see if any of them are worth adding to your insurance policy.
Be sure that any other driver you plan on using on your vehicle is listed on your policy as a regular driver. Most policies do not cover unlisted drivers unless the driver is listed on the policy. In most cases, they must be listed on the policy and not living with the insured. You’ll also need to check the liability limits to determine if you’re fully covered. If you live in an area with a high crime rate, you should take out a rental car insurance policy.
You should also consider purchasing bodily injury liability coverage. This coverage pays for injuries or damage to the other party if you’re at fault. You may need to select this type of coverage if you have passengers in your car. However, the coverage doesn’t cover household members. Personal injury protection, or PIP, will protect your finances if you ever get into an accident. A car insurance policy with liability coverage is a must-have in almost every state.
Collision coverage will cost you an average of $382 per year, and your policy will depend on the value of your car and your driving history. Also, you should consider a higher deductible if you have assets you want to protect. As a general rule, the more coverage you need, the lower the cost of your policy. However, you should always look for the best coverage for your money. This way, you’ll know exactly how much coverage you need.
Non-owner car insurance, also known as non-owner car insurance, is a great option for people who need coverage but don’t own their cars. It ensures that your car is covered at a minimum level when someone else drives it. It also removes the worry of whether the car owner’s insurance policy is sufficient to cover you and your car in the event of an accident. Alternatively, if you have a family member who lives with you, they should be added to the car owner’s policy.
In addition to liability coverage, your car insurance policy may include uninsured motorist coverage or personal injury protection. The latter covers the costs of paying for medical expenses and repairs that you’re involved in. However, it’s possible to sue an underinsured driver for an additional amount of money in case you get into an accident, but you’re more likely to have assets to cover your costs. If you choose this option, make sure to read your policy carefully.
Car insurance is an important part of your financial security. Not only will it protect you in the event of an accident, but it will also keep your bills paid if someone else causes damage to your car. It is important to remember that car insurance policies vary in price, so be sure to research your options carefully before signing up. Once you have a policy in place, you can feel confident that you’re fully protected in case of an accident.
In most states, you must have liability insurance. But if you’re the one who caused the accident, you’re still responsible for any damages that the other driver causes to you. It’s a good idea to have additional coverage in case the other driver has no insurance at all. You can also opt for uninsured motorist coverage if you’re concerned about being at fault in an accident. This coverage may be mandatory in your state, but it’s optional in others.