
Small indentations, scrapes, and holes can easily be fixed with spackle. Then a little interior painting and your walls will look like new again! But larger issues, such as cracks due to house settling or water damage, require a more involved repair process.
Cracks appear in the drywall panels that form your home’s walls and ceilings. They manifest due to shifts and settling in the foundation, causing the drywall to move and expand or contract. Small hairline cracks are generally nothing to worry about and reflect natural movement of the house, but they can be early warning signs that you may need a serious foundation repair. Large, jagged and diagonal cracks are definitely red flags and indicate that a serious problem exists.
The first step to repairing a crack in drywall is to assess the severity. Look at the size, direction and location of the crack to see if it is superficial or deeper. If the crack is long and reaches across part of a wall or ceiling, it’s likely an indication of major structural damage that requires professional attention.
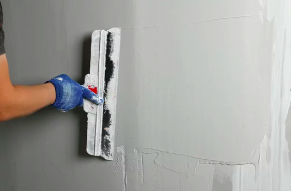
If the crack is small and has not changed in size, it’s probably just surface damage and you can cover it with a coat of paint or joint compound. If the crack has widened and is changing in shape, then you need to add some reinforcement and fill the gap. Use a putty knife to apply a thin layer of joint compound (also known as drywall mud) to the crack, then smooth it out with a 3- to 4-inch drywall knife. Using the knife, press the putty into the crack to make sure it is secure and to fill in the gap.
You can also use a strip of fiberglass mesh drywall tape to reinforce the area and keep it from cracking again. This is a much stronger material than duct tape and can be purchased at most hardware stores.
When repairing a drywall crack, you should always be careful to not just mask the problem with spackle and paint. If you don’t address the root cause of the cracks, it’s likely they will reappear, possibly worse than before. Instead, hire a qualified professional to take a look and provide you with the best solution. Most likely, they will recommend that you get extensive foundation work done to correct the problems causing the cracks in your home’s structure and foundation.
Holes
Small dents and holes in drywall happen from moving furniture, dropping something hard on the wall or kids and pets playing indoors. These are minor blemishes that can usually be easily repaired with spackle or a mesh patch kit.
When repairing drywall, make sure that the area is clean and dry before you begin. This is especially important if you’re going to be painting the area soon. Also, be aware that repairing drywall can create a lot of dust and debris so it’s best to move anything you don’t want covered in dust or plaster out of the way.
Once the drywall repair is complete, sand it smooth and apply a primer to help it blend in with the rest of the wall. Finally, you’re ready to paint.
The cost of repairing a hole will depend on the size and extent of the damage. It will also depend on the materials and labor required. Generally, however, the national average is $50-$80 per square foot of damage.
Larger holes will require more than a spackle kit and will need to be braced. To do this, use a utility knife to cut a section of drywall around the damaged area that’s two inches above and below the hole. Then, carefully pry the corner bead from the wall and remove it using a wide straight-blade screwdriver or thin pry bar.
If the hole is in a corner, you will need to install a new piece of corner bead to match the old one. This will require cutting a length of furring strip to the correct length and then installing it using drywall screws. Depending on the size of the hole, you may need to install another furring strip along the edge of the wall on either side of the hole to ensure that it’s securely fastened to the surrounding wall.
Once the drywall patch is in place, you’ll need to cover it with a layer of joint compound. Then, use a putty knife to smooth the compound and feather it into the surrounding wall. After the second coat of joint compound is dry, you’re ready to paint. Make sure that you prime the repaired area to seal the joint compound and drywall and prevent it from reacting with the finish paint.
Sagging Ceilings
Sagging ceilings can be more than just unsightly – they can be dangerous, especially if they’re at an advanced stage of sagging. If the sagging is severe, the underlying support beam may need to be replaced or at least reinforced, which will require contractors. In such cases, it’s best to have a professional building inspector conduct a thorough pre-purchase inspection so that they can identify the cause and recommend the most effective repairs.
Drywall ceilings can become sagging from several causes, including insufficient fastening or poor support construction. It can also be caused by water damage, aging and environmental conditions like humidity levels. Even long-term exposure to vibrations can cause a sagging appearance. This could be from the roller doors on your garage or if you live near to a railway line, for example.
Another common reason for sagging is excess weight through insulation layers. Insulation is added to drywall to provide both thermal protection and extra strength against gravity pulling down on the wall or ceiling from above. If too much is used, this can add a lot of extra weight and cause the drywall to sag.
If a sagging ceiling is caused by water damage, it’s crucial to call in a plumber as soon as possible to stop the leak before it worsens. If left unaddressed, water can lead to wood rot and structural joist warping which can then contribute to a ceiling collapse.
If a home’s foundation has shifted over time, this can cause sagging in the drywall and may be an indication of a serious problem with the structure. An expert building inspector can help determine the extent of the foundation shift and whether it needs to be replaced or just patched.
Mold
Mold on drywall is a serious problem and should be dealt with immediately. If left unchecked, it can spread to other parts of the house and wreak havoc on health and structural integrity. Mold is usually spotted as dark splotches and is commonly found in high-moisture areas like bathrooms, basements and kitchens.
First, make sure you are wearing proper protective equipment. You will want rubber gloves, goggles and a respirator mask to keep from breathing in any mold spores that may be airborne. You will also want to remove any furniture from the area and cover the floor with plastic sheeting. Then, spray the area with a mold-killing solution. You can use a natural cleaner such as baking soda or borax, or for more severe cases, a bleach solution. There are also store-bought spray solutions such as Concrobium Mold Control that will eliminate mold and mildew while creating a protective barrier against regrowth. Be careful not to over-spray the area as excess moisture will only cause more mold growth. After you have sprayed the area, scrub it using a brush or toothbrush and wash off any remaining residue with a damp sponge. Once the area is clean, you will want to dry it as much as possible. Be sure to point a fan directly at the spot and let it run for 24 hours.
It is important to address the source of the moisture that caused the mold in the first place. This could be a leaky window or pipe, a roof issue or improper ventilation in the space. Once the moisture is fixed, the mold should not return.
If you notice mold on painted drywall, it is a sign of a bigger issue in the stud space behind the wall. It is possible to remove the moldy drywall and replace it, but you will need to hire a professional to make sure that you are getting rid of all the spores that have grown into the wood studs. You will also need to treat the surrounding drywall with a mold and mildew primer like Kilz to prevent regrowth.